When my father spent a few days visiting, we discovered that he LOVES crème brulee. It turns out that the dish is not very difficult to make, so Ken gave us a couple cooking lessons. It was certainly a chore to make and eat those delicious delicate desserts, but we all make sacrifices for family. I believe that my dad recently tried the recipe on his own. Maybe he will post a comment to let us know how it went.
Ingredients:
1 qt. heavy cream
6 egg yolks
1 C sugar
1 vanilla bean, split (scrape out the bean if you don't want a speckled brulee)
Heat the cream and vanilla bean over-medium high heat and bring to a boil. Remove from heat and allow to cool. Remove vanilla bean.
In a non-reactive bowl, whisk 1/2 C sugar with the egg yolks until creamy and the egg yolks start to lighten in color.
Slowly pour a little of the cooled cream into the egg mixture while stirring. Continue until the cream and eggs are well mixed.
Pour the liquid evenly into small dishes (ramekins) and place them in a baking pan. Fill the baking pan with enough water to come up about half way around the dishes.
Bake the crème brulee at 325 degrees until the brulee is set but still trembles when agitated (about 45 minutes). Then, cool the brulee in the refrigerator for several hours.
Dust the brulee with a thin layer of sugar and then use a blow torch to caramelize the sugar and form a crispy top layer.
Enjoy!
Wednesday, November 14, 2007
Monday, November 12, 2007
Banana Coffee Cake and Quiche
With all of the houseguests we've had recently, I've had the opportunity to brush up on my brunch cooking skills. To the right you'll see pictures of a banana coffee cake. This recipe is amazing and combines the best parts of banana bread and coffee cake. I found the recipe in one of my mother's old cookbooks, The Anderson House
Cookbook. The cookbook is from a lovely bed and breakfast that my parents used to frequent in Wabasha, MN. The Anderson House is located near the Mississippi River and at 150 years old, is the oldest bed and breakfast in Minnesota. This cookbook is a compilation of recipes that have been collected and served at the Anderson House since it first opened. Accompanying many of the recipes, you'll find historical accounts about the origins of a recipe or how the inn used to operate. All in all, its an excellent and fascinating cookbook and has old hearty Minnesotan recipes that you couldn't find anywhere else.
Below the coffee cake, there are a couple images of a spinach, caramelized onion, goat cheese, and chive quiche. My aunt is a master of quiches and she has inspired me to also often serve them for brunches. I think Ken would get sick of eating them on so many Sunday mornings if they weren't so versatile and, um, really really good.
Saturday, November 10, 2007
Tilapia with Fall Harvest Vegetable Medley
So as I'm behind on posting and have a lot less free time for everything, I probably won't put up recipes for every set of pictures I post. If, however, there is a recipe that anyone would like, please feel free to post a comment or email me.
These photos are from a dinner we had with a visiting friend about a month ago. The salad is a pretty basic balsamic reduction vinaigrette with fresh greens. Ken made a version of goat cheese croutons that we've really enjoyed on a number of occasions. They're quite tasty and are from The Wine Lover's Cookbook which I previously mentioned in this post. We also had a three step cornmeal breaded Tilapia with Burre Blanc and a medley of squash, zucchini, and shitake mushroom. Ken has really been enjoying this vegetable medley and you'll probably see it accompanying a few other dishes. At some point, I will post pictures and a recipe for the vegetable dish, as it’s become one of our favorites.
Tuesday, October 30, 2007
Ravioli
Apologies again for being bad about posting. I have a whole bunch of images just waiting to be put on-line but I seem to be continually pre-occupied with this whole school thing... and sleeping. Sleeping is nice.
In any case, I thought I'd put up some photos of a recent visit from a couple friends of ours. We had a lovely weekend with them and spent a lot of time playing cards, drinking, and catching up. On Saturday night, we decided to make ravioli as its sort of a fun and interactive dish. In fact, making ravioli always reminds me a bit of doing arts and crafts during day camp... except that you can eat your final project. Hmmm, well I guess arts and crafts often involve dry pasta, which technically you could eat... and there are always some kids that eat a bit of paste... but I'm sure this final project tastes way better.
Anyway.
We started the meal with a scrumptious fresh cesear salad with homemade crutons and dressing (see above). Ken made the pasta and the fillings but we all worked together to stuff them. The fillings were a shitaki mushroom and cream filling, a chevre and savory filling, and a roasted corn and peppercorn cheese filling. The fillings were all pretty amazing and we ended up eating the extra with spoons. Once the pasta was cooked, we tossed it with butter and roasted garlic and served it with green beans. The three raviolis went together very well and melted in your mouth. Mmmm. To the left you can see pasta pictures and Friel and John putting the ravioli together. I also have other pictures of homemade pasta from different dinners, so I hope to write a more detailed account of how to make pasta when I post about one of those meals.
Take care and I'll try to post again soon.
Saturday, September 29, 2007
Update
I know that its been ages since I've written. We've been a bit preoccupied by crazy complications in our lives and, of course, I'm just starting graduate school. (Turns out thats quite a bit of work. Who knew?) On the bright side, I have a lot of new scrumptious looking pictures of food. I promise to post some of them soon.
Until then... Toodles.
Monday, September 10, 2007
Penne with Sausage, Shiitake and Portobello Mushrooms, and Zinfandel
I made this dish the other night while Ken was at work. It was delicious and not very difficult to make. The recipe itself is based off of a recipe found in The Wine Lover's Cookbook written by Sid Goldstein. Ken and I like this cookbook quite a bit. I originally found it in the sale section of a bookstore, leafed through it, and was drawn to the detailed explanations of wine and food pairing. While many of the recipes are a little too complex for a beginner and call for rare and sometimes expensive ingredients, there are a number of innovative and really quite remarkable recipes as well. A number of our favorite dishes were directly inspired by recipes in this book. I would certainly recommend that a dedicated cook check this cookbook out... but vegetarians beware, most of the recipes involve meat or seafood.
Here's this recipe.
12 oz. Italian sausage
2 T olive oil
1 1/2 C chopped yellow onion
4 cloves garlic, chopped
8 nice shiitake mushrooms
(original recipe calls for 2 oz. dried porcini)
3-4 portobello mushrooms
1 T crumbled dried rosemary
1 T dried thyme
2 tsp kosher salt
2 tsp fresh black pepper
1 1/2 C Zinfandel
(original recipe calls for Syrah)
1 C chicken stock
4 tomatoes diced
(can use 2 cans of diced tomatoes)
2 T tomato paste
shredded Asiago cheese to top
1 lb. dried Penne
Saute the sausage over medium heat until browned. Remove the sausage with a slotted spoon and reserve (pat dry with paper towels).
Heat the olive oil and saute the onions and garlic until the onions are translucent (approx. 5 min). Add the mushrooms, herbs, salt and pepper and continue to saute until the mushrooms start to soften and cook down (4-6 minutes).
Add the wine and bring it to a boil. Reduce heat and simmer until the wine is reduced by half. In a saucepan, start heating water for the pasta.
Add the tomatoes, tomato paste, and chicken stock. Simmer until the tomatoes soften (10-15 minutes). Add the pasta to the boiling pot of water sometime while the sauce is cooking. When the sauce is at the desired consistency, add the sausage and heat through. Salt and pepper to taste.
Drain the pasta and add the sauce. Mix thoroughly (for the picture, I didn't mix the pasta and sauce which was sort of silly. It tastes better all mixed together and is very pretty as well.)
Top with shredded Asiago cheese and serve with Syrah or Zinfandel.
Saturday, September 8, 2007
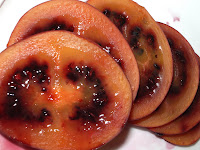
Tamarillos: The tomato fruit?
Ken spotted an unusual looking fruit as we wandered through the grocery store last weekend. Always willing to try something new, we purchased the fruit and brought it home to try. It was a tamarillo.
The fruit was described to us as tomato-like so we decided to first try it raw. It was unlike anything I'd ever had before. The first bite tasted a bit like a peach with a plum's texture. As I started to chew, the flavor morphed into a distinctively tomato-like flavor. The effect was not altogether pleasant but that may just be because it was so unique.
I think that we're both interested in experimenting with this fruit again. I've looked up a few recipes but if anyone has any suggestions please let me know. I'll certainly write a post if we come up with any tasty tamarillo creations.
Thursday, September 6, 2007
Hearty Beef Stew
I grew up in rural Minnesota and no matter how far I travel or how different my life becomes, Minnesota will always hold a rather sizable chunk of my heart. I have no doubt that with little effort I could overwhelm you with memories, theories, and plenty of poetic sense and nonsense about my home state. However, I believe I have the restraint to keep my musings brief... at least for the moment. You may be wondering what any of this has to do with beef stew. While this is a reasonable question, the answer seems rather obvious to me. Being a Minnesotan, I cannot in good conscious ever discuss beef stew without first offering a brief nod to the land of 10,000 lakes. In Minnesota we know and love our stews, hotdishes, casseroles, pot pies, pasties... basically, we specialize in any hearty meal that involves a bunch of meat, potatoes, vegetables, and other miscellaneous items jumbled together in a large vessel. I can imagine nothing more welcome on a frosty afternoon than a steaming bowl of beef stew, and nothing more wholesome than a spread of 20 hotdishes and a sea of friendly faces at a potluck. It would seem like a terrible betrayal to write about this one beef stew and its rather charming chef without also acknowledging the lifetime of amazing food shared with me by the community that first shaped my life. Thank you all.
So. Ken made this stew as part of the meal planning/organizational extravaganza that I mentioned in the previous post. In the end, the stew was really quite remarkable. I probably shouldn't give away the big secret that made this stew so fantastic- but, eh, what the heck. The secret ingredient was the leftover reduced beef gravy from the roast dinner. It was extremely rich and flavorful and was just the right addition to transform this stew from a good meal into a succulent mouth watering experience.
The recipe follows. As autumn sets in and cold weather starts to arrive, I highly recommend making a nice stew. Really, there's nothing quite like it.
1 lb cubed raw beef
3 carrots coarsely chopped
1 onion, chopped
4 potatoes in chunks
green beans, cleaned and cut into sections
2 tomatoes, coarsely chopped
4 C beef stock
1 T tomato paste
1 bay leaf
dried thyme, salt & pepper to taste
Cook the carrots and onions in a heavy saucepan over med-low heat until they are just starting to caramelize. Next add the tomato paste and fry it for about 1 min. Then add the stock. In a regular frying pan, brown the beef chunks. Once the meat is browned, dump it and everything else into the saucepan and cook for 4 hours.
We ate the stew with toasted and buttered sourdough bread. Yum.
Wednesday, August 29, 2007
Roasted Beef, Roasted Rosemary Potatoes, and Roasted Asparagus
To economize and have more organized meals, Ken and I have been working on planning our shopping and cooking schedules ahead of time. I have no idea if we'll actually be able to do this for more than a few days but so far its been working alright. At this point we have managed to use a chuck roast to make roasted beef and a delicious beef stew and we're planning to turn a roasted chicken into enchiladas and chicken pot pie.
Below are a series of photos of the meal prep. I am not going to write out a recipe because I think its fairly intuitive. (If anyone would like the recipe, please feel free to write a comment and I will put it up.) The only slightly unusual thing that Ken did while making the sauce was to reduce beef stock for a long time to make it more flavorful.
Look for a recipe and photos of the beef stew very soon.
cheerio!
p.s. Ken just came over to look at the pictures I was putting up and started muttering angrily at himself. Apparently, he wrapped the roast the wrong way. He said if the striations in the meat were going lengthwise, the meat would have been more tender after it was sliced. Not a cooking disaster per se, but I'm sure he'll be more careful next time.
Sunday, August 26, 2007
Pan-Fried Tilapia with Salsa Verde and Spinach and Tomato Pilaf
I don't really have much of a story for this recipe. We wanted to have fish for dinner one night last week and Ken came up with this recipe. We chose tilapia because it is a mild-flavored and affordable fish. Most tilapias, according to Ken who knows a lot about fish for some reason*, are omnivores. This means that they are easy to raise in fish farms and the flavor difference between wild and farmed tilapia is small.
The dish turned out quite well and the contrast between the salsa verde and the mild fish and rice was tantalizing. Unfortunately, the final pictures did not turn out as well as usual for a few reasons (which include things like pan frying instead of deep frying, which yields a less evenly coated batter; the similarly mottled appearance of each component of the final plate; over-sized portions; and an impatient and starving photographer.)
Huh. I guess I did have something to say after all. In any case, I've included a recipe below.
Spinach and Tomato Rice:
When Ken makes rice, he usually begins by sweating some small onion pieces over low heat in a saucepan with a bit of oil. Once the onions turn translucent, he adds the rice and fries it for a bit over high heat (stirring frequently). When the rice turns a sort of pearly color, then he adds the appropriate amount of water, brings the pot up to a boil, covers the pot, and puts it in the oven at 350 until it is cooked (20-30 minutes). I always used to make rice on top of the stove, but I have been completely converted to this method of making rice. Not only do you save stove space, you avoid having to watch for boiling over and the rice NEVER burns to the bottom of the saucepan. Its amazing. If you don't cook rice this way, you should. (If you don't want onions in the rice just leave them out and lightly fry the rice before adding water.)
In any case, this rice was slightly more complicated than what I've described above. Before Ken added the water to the rice, he also added about 1 C of diced tomato and fried the tomato with the rice/onions until they were a little soft. He then added a bay leaf and the water and put the covered saucepan in the oven. Once the rice was cooked, he removed the pan from the oven and set it on the stove to cool. He opened the lid and added several large handfuls of fresh spinach and covered the pan again. The spinach began to wilt while the rice cooled. Once the spinach was a bit wilted he tossed the spinach into the rice until evenly mixed and added salt and pepper to taste.
Salsa Verde
10 tomatillos
1 medium white onion
poblano chillies (or favorite green chili) to taste
fresh cilantro to taste
lime juice
salt
pepper
sugar to taste (very little- just enough to cut the bitterness of the lime)
Roast the tomatillos in the oven until they are soft and the skin starts to have dark spots. Let them cool and then put everything in a food processor and blend until it is of the desired consistency. Cool in refrigerator.
Pan-Fried Tilapia
To make the tilapia, ken cleaned and washed the fish and then evenly coated it with corn flakes. He lightly fried the fish in oil over the stove.
So that's all seems easy enough, huh?
It was a nice refreshing meal on a summer's day and really didn't take too long. Plus, we had mad left over salsa verde which was very nice.
*Ken wanted me to point out that "some reason" is actually that he enjoys fishing as a hobby and that it is also part of his job to know about the fish he cooks. I maintain that all of those rationales were adequately covered by the more general category of "some reason". Nevertheless, now I've explained it all and everyone feels happier. Relationships are all about compromise folks.
The dish turned out quite well and the contrast between the salsa verde and the mild fish and rice was tantalizing. Unfortunately, the final pictures did not turn out as well as usual for a few reasons (which include things like pan frying instead of deep frying, which yields a less evenly coated batter; the similarly mottled appearance of each component of the final plate; over-sized portions; and an impatient and starving photographer.)
Huh. I guess I did have something to say after all. In any case, I've included a recipe below.
Spinach and Tomato Rice:
When Ken makes rice, he usually begins by sweating some small onion pieces over low heat in a saucepan with a bit of oil. Once the onions turn translucent, he adds the rice and fries it for a bit over high heat (stirring frequently). When the rice turns a sort of pearly color, then he adds the appropriate amount of water, brings the pot up to a boil, covers the pot, and puts it in the oven at 350 until it is cooked (20-30 minutes). I always used to make rice on top of the stove, but I have been completely converted to this method of making rice. Not only do you save stove space, you avoid having to watch for boiling over and the rice NEVER burns to the bottom of the saucepan. Its amazing. If you don't cook rice this way, you should. (If you don't want onions in the rice just leave them out and lightly fry the rice before adding water.)
In any case, this rice was slightly more complicated than what I've described above. Before Ken added the water to the rice, he also added about 1 C of diced tomato and fried the tomato with the rice/onions until they were a little soft. He then added a bay leaf and the water and put the covered saucepan in the oven. Once the rice was cooked, he removed the pan from the oven and set it on the stove to cool. He opened the lid and added several large handfuls of fresh spinach and covered the pan again. The spinach began to wilt while the rice cooled. Once the spinach was a bit wilted he tossed the spinach into the rice until evenly mixed and added salt and pepper to taste.
Salsa Verde
10 tomatillos
1 medium white onion
poblano chillies (or favorite green chili) to taste
fresh cilantro to taste
lime juice
salt
pepper
sugar to taste (very little- just enough to cut the bitterness of the lime)
Roast the tomatillos in the oven until they are soft and the skin starts to have dark spots. Let them cool and then put everything in a food processor and blend until it is of the desired consistency. Cool in refrigerator.
Pan-Fried Tilapia
To make the tilapia, ken cleaned and washed the fish and then evenly coated it with corn flakes. He lightly fried the fish in oil over the stove.
So that's all seems easy enough, huh?
It was a nice refreshing meal on a summer's day and really didn't take too long. Plus, we had mad left over salsa verde which was very nice.
*Ken wanted me to point out that "some reason" is actually that he enjoys fishing as a hobby and that it is also part of his job to know about the fish he cooks. I maintain that all of those rationales were adequately covered by the more general category of "some reason". Nevertheless, now I've explained it all and everyone feels happier. Relationships are all about compromise folks.
Tuesday, August 21, 2007
Glazed Pork Tenderloin with Roasted Apples and Shallots
A while back in Chicago, I was spending a lazy afternoon watching cooking shows on PBS. When Ken got home from work later in the day, I described my hazy recollections of a few interesting dishes that I'd seen. There was a recipe for fish baked in a huge pile of salt, grilled artichoke hearts, and a recipe for pork served with roasted apples and shallots. Recently, we were planning a shopping list and thinking about some meals we wanted to try when we recalled the pork dish. Ken purchased ingredients and made up a recipe based on my descriptions of what I'd seen. The final product was fantastic and Ken commented that it might be the best pork tenderloin he'd ever eaten- let alone made. I thought the roasted apples and shallots were just a spectacular combination. Yum.
As I was preparing to write this post, I did some searching and managed to locate the show that I had seen and the original recipe that I was remembering. Ken's variation is a bit more complex, but I imagine their recipe would be quite tasty as well. I remember the show itself as being cute and inviting. I would certainly recommend watching it if you happen to run across it on television. After reading about the two chefs a little more, they seem like an interesting and knowledgeable pair.
Preparing the Apples
and Shallots:
2-3 nice apples
8 shallots
4 T melted butter
salt to taste
Preheat oven to 375.
Clean shallots and cut big bulbs so that the shallots are roughly the same size. Cut the apples into chunks that are a similar size as the apples. While cutting the apples make sure to toss them in the butter immediately to avoid browning. After the apples are coated in butter, place them on a baking sheet. Then coat the shallots with the remaining butter and pour all of the shallots and butter onto the baking sheet with the apples. Season lightly with salt. Toss the apples and shallots a little on the baking sheet to insure that the entire sheet is lightly coated with butter. Roast the shallots and apples until they are soft and starting to turn brown (1 1/2-2 hours).
Preparing and cooking
the Pork:
1 medium-sized pork tenderloin
1 T salt
1-2 tsp cracked black pepper
2 T olive oil
1/2 tsp fresh thyme
1/2 tsp fresh rosemary
Take pork out of fridge about 2 hours before you want to cook it to allow the meat to come up to room temperature. (Ken says the meat cooks more evenly, doesn't dry out, and allows for more control if its at room temp.) Season the meat about 15 minutes before cooking with an even coating of salt and cracked black pepper. While you wait for the meat, mix the olive oil with thyme and rosemary. When the meat is ready, take the herb soaked olive oil and rub it over the raw meat. Heat a regular saute pan over high heat with a tsp of olive oil. Coat the pan well and then sear the meat on all sides. Once the meat is browned put the meat on a rack in the oven next to the shallots and apples. Cook the meat until done (30-45 minutes).
To baste the meat:
3 T honey
3 T melted butter
2 T nice spicy mustard
1/2 tsp molasses
Whisk together honey, butter, mustard, and molasses. Use a brush to coat the pork every 10 minutes while it cooks in the oven.
Preparing the Sauce:
1 cup chicken sauce
4 T butter
While the meat is cooking, take the saute pan that has the left over browned pork bits. Use white wine (or water or chicken stock) to deglaze the pan over heat. Once the meat and shallots/apples are finished cooking, remove them from the oven. Add the remaining honey glaze and all of the juice and browned bits from the baking sheet with the pork drippings and apple shallot remnants. Add some chicken stock. Cook the sauce down until a little thicker and adjust to taste by adding salt, additional ingredients, etc. Remove the sauce from heat, add the butter and swirl it around until it melts.
To serve:
Plate everything and eat.
Bon Apetite!
Friday, August 17, 2007
Bad Behavior
I write with sad sad news... but never fear. I intend to quickly distract you from all that sorrow by talking about my lively pup.
But first. Our desktop computer recently suffered a mid-life crisis and decided to take some time off. Now while this is really annoying for a number of different reasons, its particularly obnoxious because that computer held most of our electronic data... including all of the food pictures that I've taken over the last few months. Right now, we're mired in trying to recover data and determine what (if anything) was backed up. I'll let you know how that goes. But basically, this means that I can't show you some of the lovely pictures of scrumptious food that had yet to be uploaded... and unfortunately, I just cleared the memory card on the camera-- so they may be gone for good.
In the meantime, I thought I'd put up some rouge pictures of my dog, L (named after the elevated trains in Chicago). I adopted L about three years ago from a dog shelter. I have been meaning for some time to contact the shelter (and one employee in particular) to let them know that L (formerly Naomi) has found a happy home and has a good life. While I know that any shelter would be pleased to know that one of their dogs found a good home, I think they might be particularly pleased that L is doing well because it wasn't always that way.
When I first adopted L, she had severe dominance issues. I believe (for several reasons) that L was abused before I knew her and I know (from shelter records) that L was placed repeatedly and unsuccessfully with many families. Learning to take care of her and dealing with these issues took a long time and a lot of hard work. I had to learn about and extensively research canine behavior and dominance issues. I spent even more time working with L, training her, and teaching her how to be a good companion. Sometimes progress seemed slow but over time she has become a loving mellow animal who is part of the family. These kinds of behaviour issues always require constant vigilance but, overall, today she is a happy and lucky dog with a good life.
She is also very playful and often quite clever. One of the things that made her a very bad dog when she was challenging authority is also one of the most fun things about her now that she behaves well. L is particularly sensitive to moods, generally attentive to people and their behavior, and extremely stubborn. You can imagine how unpleasantly these qualities could be combined to, say, steal and angrily guard a person's wallet for several hours... alternatively, they could be used in a positive manner to learn new games and tricks. L loves learning new things. One of L's favorite games is hide and seek. We play this a few different ways. Sometimes, I will just tell L to sit and wait while I run off and hide. I then tell her "Ok! L!" and whistle for her. Other times, Ken or I will hide and then the other will tell the dog to go find that person. L loves these games, bounds around, and always looks so pleased when she's found us. She's also learning to go find toys and specific objects in the house. It's all great fun.
In any case, I guess my point here is that if L can change from being an angry frightened animal to a lovely well-behaved dog, don't give up hope... Perhaps my computer will abandon its blue screen of death, turn on, and miraculously have all of my files in working condition.
Here's hoping.
Monday, August 13, 2007
One Last Dinner in Chicago
On one of our last nights before we packed everything away into boxes, we had a quiet dinner with two of our dear friends. In many ways, it was like so many dinners we'd had before in that apartment. The company was lovely, the food was amazing, the wine flowed freely, and the tiny kitchen was sweltering and nearly uninhabitable. I will miss Chicago and my friends, but Ken and I are both glad to be living in a house with central air and a usable kitchen.
Below are pictures of our meal. Unfortunately, I do not recall the wines we paired with each dish (although I do remember that our friends brought over a lovely red). Below, I've written the names of the dishes and a few of my impressions of the food.
Mixed greens,
fig compote with prosciutto, and blue cheese.
This dish was quite remarkable. I would never have thought to add warm figs to a salad, but the gently sweet, soft, warm tones and textures of the figs contrasted well with the prosciutto, lettuce, and blue cheese. This may be my new favorite salad.
Ruby Red Trout Fillet poached in lemon juice, shallot, and butter with a chive buerre blanc.
Served with sauteed baby leeks and chive mashed potatoes in a potato cup.
The trout was perfectly done and the sauce was really delicious. It was a lovely light meal for a hot day. The leeks were also flavorful, very well cooked and went well with the sauce. I think the only complaints about the plate were 1) the potatoes could have been a bit more creamy and 2) the sauce, while extremely tasty, might have been more visually striking if it were of a slightly different color.
Bananas Foster
The bananas foster were good but not particularly surprising. We remembered, belatedly, that one of our guests detests bananas. Nevertheless, she managed to choke down most of the desert- saying she had never enjoyed a banana more. Of course, I don't know if that says more about Ken's bananas foster or our friend's politeness. In any case, for most of us the heavy creamy desert was quite appealing after such a light meal, but the ice cream melted very quickly. With that heat, it took only moments for the hot bananas and cool ice cream to turn into a luke-warm soup. Oh well. Everybody loves soup.
Friday, August 10, 2007
Camarones en Salsa de Serrano
Apologies all around for the long hiatus. However, I do have some good news. We are now officially moved and unpacked. I have lots of food pictures and news to catch up on, so we should be posting more regularly again from now on.
Below is a recipe that Ken made on a summer's night while my younger sister was visiting. It is a very fresh, bright, and beautiful dish that is perfect for serving on an oppressively hot day. This recipe is based on a recipe from Rick Bayless. Ken tweaked the recipe slightly but it remains similar to the original.
Salsa Preperation:
In a non-reactive bowl, combine the following ingredients:
4-5 medium sized ripe tomatoes, finely diced
1 finely diced & rinsed medium onion
3 serano chilis, very finely diced (quantity to taste)
2 T fresh cilantro,
fresh lime juice, salt and pepper to taste.
Taste and adjust ingredient quantity as necessary. Put the bowl in the refrigerator to rest for at least an hour (could be made the day before).
Shrimp Preparation:
You will need 1 lb (18-20 ct.) shrimp. Here we used tiger shrimp.
Peel and de-vein the shrimp. In a non-reactive bowl, combine the shrimp with the juice of 2 limes, 1/2 T salt, 1 tsp cracked black pepper. Adjust seasoning to taste. Marinate shrimp in fridge for about 1/2 hour.
Cooking the Shrimp:
You will need to use two different skillets to cook this dish, a heavy regular, or cast iron pan (it should NOT be non-stick) and a regular non-stick/stainless steel pan. Coat the cast iron pan with a thin layer of olive oil and heat it to medium high heat. Pour about 1/2 inch layer of the salsa mixture into the non-stick pan and heat it over low heat (the salsa should reach a low simmer).
Once the pans are heated, put one layer of shrimp in the cast iron pan and let them cook for 15-30 seconds. After that, move the shrimp into the second non-stick pan with the uncooked side down. Put another layer of raw shrimp into the cast iron skillet. While the shrimp in the cast iron skillet cooks, remove the shrimp from the salsa pan and set it aside. Then, move the shrimp from the cast iron skillet into the salsa, and so on. Repeat this process until all of the shrimp are cooked. Be sure to add more salsa and olive oil to their respective pans as necessary.
Once all of the shrimp are cooked and set aside, pour all of the remaining salsa into the non-stick pan and heat through. Pour the salsa over the cooked shrimp.
Garnish with cilantro. Serve with fresh warm tortillas and rice.
Subscribe to:
Posts (Atom)